Monday, December 10, 2012

Double Chocolate Peppermint Biscotti

My favorite and most popular recipe!  The ever amazing Double Chocolate Peppermint Biscotti!
I bake these for the restaurant I work at, and I just can't keep them on the shelves.  They are such a hit for so many reasons.  They are so festive, decorative, and delicious.  They make a good treat, gift, stocking stuffer, anything!  So easy and so gorgeous.
First mix together all of the dry ingredients.  Flour, cocoa, salt, and baking powder.
Now, with an electric mixer (don't use a hand mixer, the dough can get too thick and burn it up.) beat the butter until it is smooth, then add the sugar and beat until it is light and fluffy.  Next add the eggs peppermint extract.
Finally, mix in the dry ingredients until well combined.  Fold in the chocolate chips.
Put the dough into two even sized balls on a cookie sheet lined with parchment paper. Work the dough until you get two nice logs.  Keep your hands damp, but not soaked, to keep the dough from sticking to your hand and give it a smoother appearance.
Now toss them in the oven at 375 Degrees and bake for about 15 minutes. Take them out when top feels firm.  Let them cool, and then with a serrated knife, cut the logs in half (at a 45 Degree angle) and carefully peel them off of the parchment paper.  If they aren't firm enough to handle, they aren't done yet.
Now cut them at the same 45 Degree angle, about 1/2 an inch to one inch wide.
Place them sideways straight on the tray, put them in at 325 Degree oven for an additional 8 minutes, then flip them and bake for another 8 minutes.
When they feel firm and dry, take them out and let them cool.
Melt the White Chocolate and Sprinkle with Peppermints and you're done!
Bag them up and share them!
 
Recipe:
Ingredients:

1/2 cup butter
2/3 cup sugar

2 eggs
1 tsp peppermint ex
1-3/4 cup flour
1/4 cup unsweetened cocoa powder
1/2 tsp salt
2 tsp baking powder
4 oz mini chocolate chips

8 oz white chocolate
crushed peppermint candies
Pre-heat Oven to 375 Degrees F
1) Beat the butter in a mixer until creamy.
2) Beat in sugar, eggs, and peppermint ex until fluffy.
3) In a separate bowl mix the flour, cocoa, salt, and baking powder.
4) Slowly mix the dry ingredients with the wet ingredients.
5) Fold in Chocolate Chips.
6) Shape into 2 small logs. Place on Parchment Paper on a Cookie Sheet.
7) Bake for around 15 minutes (maybe a bit longer, just until the top is firm).
8) Cool and slice diagonally with a serrated knife. Let oven cool to 325 Degrees.
9) Bake on side for about 5 minutes per side or until dry.
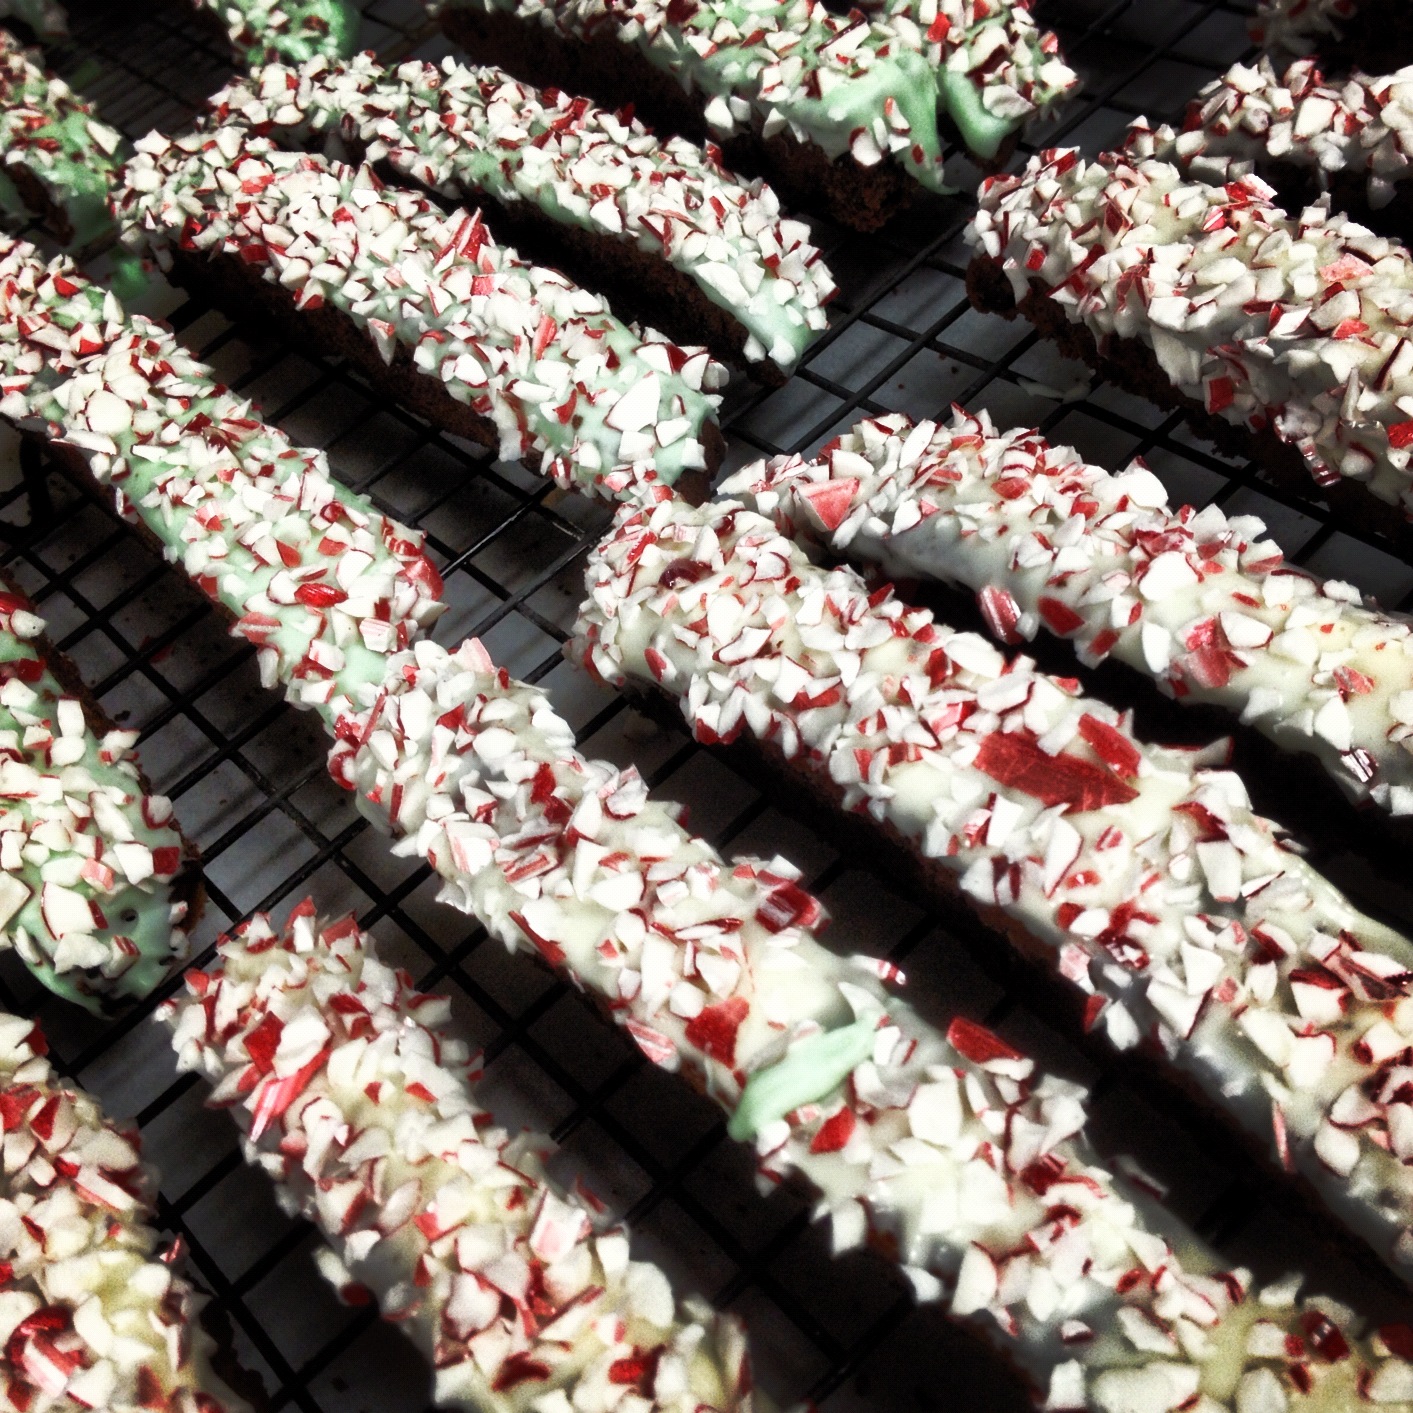
10) Melt the chocolate and sprinkle with peppermints!


Monday, November 26, 2012

Eggnog Fudge

Tis the Season!

I found this recipe idea on Pinterest and I have not heard one bad word against it.  Even my mom, who hates eggnog cannot get enough of this fudge.
 
After making it, I packaged some up in a cute little bag to send to the owner of a local restaurant that was destroyed by a flood last year.  He is currently rebuilding his bar and someone may have slipped to me that he has a certain soft spot for eggnog.  With my business card conveniently slipped in the bag, let's hope I get some good news soon!
 
Anyways, the recipe I used was your standard from scratch fudge (found here), but I also found an easier one for those who aren't so used to making fudge.  I do recommend always using a candy thermometer though because you can try to time it, but if you don't hit the right temperature, the fudge will be grainy. Most people will still like it (if they're not fudge-fanatics) but to get them to LOVE it, you need the creamy texture.
 

So here is the easy recipe:

2 cups granulated white sugar
1/2 cup salted butter
3/4 cup dairy eggnog
10.5 ounces white chocolate bars, chopped into small pieces
1/2 teaspoon freshly grated nutmeg, plus a little more for the top of the fudge
One 7-ounce jar marshmallow creme
1 teaspoon rum extract

Directions:

1. Line an 8 or 9-inch square pan with foil and let it hang over the sides. Butter the foil.
2. In a heavy, 3-quart saucepan combine sugar, butter and eggnog. Bring to a rolling boil, stirring constantly. Continue boiling 8 to 10 minutes over medium heat or until a candy thermometer reaches 234°F, stirring constantly to prevent scorching. Remove from heat.
3. Using a wooden spoon, work quickly to stir in chopped white chocolate and nutmeg until chocolate is melted and smooth. Stir in marshmallow creme and rum extract. Beat until well blended and then pour into prepared pan. Sprinkle a little freshly ground nutmeg on top. Let stand at room temperature until cooled. Refrigerate if you'd like to speed up the process.
4. When completely cool, cut into squares. Store in a covered container.


Sunday, November 25, 2012

Old Fashioned Coconut Cream Pie

My first post, first 'order' and first pie.  Yes, the first pie I have ever attempted to make and I get stuck with a Coconut Cream Pie.  It wasn't a fun night needless to say.  I had to idea where to start, what recipes to go off of, or anything.  I like my cookies and cakes, but pies are not usually my area.  But, I had two orders for the same pie, so I had no other choice and I actually enjoyed it, once I finally got it right.
 
My first attempt was a complete flop.
I followed this recipe and I don't know what went wrong.  I couldn't get the cream to thicken at all after over half of an hour.  I tried turning up the heat, adding more flour, but nothing seemed to work.  They also wanted the traditional version, meaning whipped cream topping and not the meringue, which I ended up putting on too soon and it just completely melted.
 
Obviously I had to try something different.  I figured it was a good solid recipe, but maybe just needed some tweaking.  So I started over.
I started with the easy part.  Toasted some more coconut and baked my pie crust to the perfect shade since it will not need re-baked with the filling.  Now what to do with the cream recipe? 
 
I looked around the internet for a bit to discover some helpful hints.  The biggest one perhaps was cornstarch, not flour.  This would definitely help the cream set up quicker.  I also exchanged 1 1/2 cups of the half and half for Coconut Milk to give it a stronger flavor.
It took a while to set but this was definitely a success.  Since the recipe called for corn starch, don't cook it much longer after it comes to a boil.  The cream may not seem thick enough, but it will set up more in the fridge.  Now all I had to do was stick it in the fridge and let it chill over night.
 
Morning came and I pulled out the pies to finish them off.  I made my favorite batch of whipped cream (1 cup heavy cream, 2 t. vanilla, 2.5 T. powdered sugar) and sprinkled them with some fresh coconut.  You could also use toasted, but I thought the fresh would be a nice contrast.
 
Ingredients:
1 Cup + extra sweetened coconut flakes
1 1/2 Cups Half-and-Half
1 1/2 Cups (About 1 Can) Coconut Milk
2 eggs, beaten
3/4 Cup White Sugar
1/4 Cup Corn Starch
1/4 t. salt
1 t. vanilla
 
1 Blind Baked Pie Crust
(A pre-baked pie crust)
1 Batch of your favorite Whipped Cream


1. Preheat oven to 350 degrees F (175 degrees C).
2. Spread the coconut on a baking sheet and bake it, stirring occasionally, until golden brown, about 5 minutes.
3. In a medium saucepan, combine the half-and-half, coconut milk, eggs, sugar, corn starch and salt and mix well. Bring to a boil over low heat, stirring constantly. Remove the pan from the heat, and stir in 3/4 cup of the toasted coconut and the vanilla extract. Reserve the remaining coconut to top the pie.
4. Pour the filling into the pie shell and chill until firm, about 4 hours.
5. Top with your favorite whipped cream and with the reserved coconut.
 
Whipped Cream:
1 Cup Heavy Cream whipped to form soft peaks
Mix in 2t. Vanilla and 2.5T Powdered sugar and beat until stiff peaks form.